Friday 31 August 2012

Deck Addition

We decided to add a small addition onto the deck for the BBQ to sit on. We made it 4 feet by 2 1/2 feet. We put the frame together before attaching it to the deck.


We put down pavers to support the leg posts.


Once we attached it to the deck we measured the legs and cut them to size.


Once the legs were attached we cut the planks to size and screwed them down.


It was a quick and easy project, it only took a couple of hours to complete. Now the BBQ isn't blocking the path out the back door.


Tuesday 28 August 2012

Jelly Roll

I love a jelly roll. Haven't had it in forever so my husband made me one for my birthday. His first time making a cake.

5          eggs room temperature
3/4 cup granulated sugar
1 tsp     vanilla
3/4 cup cake flour ( we used whole wheat flour and it turned out fine)
1 tsp     baking powder
1/4 tsp  salt
1/2 tsp  lemon juice
Raspberry jam or other filling

Preheat oven to 350F. Prepare 10 x 15 inch jelly roll pan. Grease well. Line bottom with waxed paper.

Beat eggs in small mixing bowl untill frothy. Beating at high speed slowly add in sugar. Add vanilla. Continue beating untill mixture becomes thick. Transfer to larger bowl.

In a second bowl mix flour baking powder and salt together. Fold into egg mixture one third at a time untill all  is moistened. Spread into jelly roll pan. Bake in oven for 15 - 20 minutes.


Dampen a tea towel. Turn pan out immediately onto tea towel.


Carefully remove wax paper.


Trim edges.


Spread with jam.


Start at narrow end and carefully roll up onto roll untill its completely rolled up.


Transfer to plate and trim edges.


Sunday 26 August 2012

Crepes

My mom makes the best crepes. She came over today for a visit and made us breakfast.


When we were growing up we never had pancakes always crepes.


Crepes:

4 eggs
2 tbsp sugar
10 tbsp flour
3/4 cup milk
1 tbsp  vanilla

Beat eggs, sugar and vanilla. Add flour and milk and beat.


Heat up your frying pan and add a little butter. Use a little more than 1/2 cup of batter and spread thin on pan.


You can lift the edge slightly to check underneath when its ready to flip.


Then serve.


I like it with a little sugar and lemon juice sprinkled on top. Syrup is great too or fruit toppings, even nutella is great.


Friday 24 August 2012

Re-Use Centre

I love our local re-use centre. It has everything you could think of. Lots of great items for craft projects. Toilet paper rolls, fabric, notions, cards, binders, records, books, tins, games, puzzles, old trophy's, the list goes on and on. You can drop off items for donation and you can take as much stuff as you want for $5. My friend has 24 free passes to the centre so this trip was free. We picked up lots of coffee cans for nail and screw storage in the garage and lots patterns to add to my collection. We also got some labels and a couple records.

Thursday 23 August 2012

Basement

It was pretty gloomy out yesterday when we got up and the backyard was too muddy to work in so we decided to start the basement reno. We got a large majority of the basement drywalled. It wasn't too bad to do. A bit of trimming at the top of each board. A few boards needed holes for outlets and a couple needed really big holes for the window. Its slowly getting there. I have to say this is the project I'm most excited about completing.


Thursday 16 August 2012

Backyard

My dad came by today and trenched out a line for us to run more electricity out to the garage.


Got a surprise load of dirt delivered today as well.


We are having topsoil put down in the backyard tomorrow. Once the final grade passes inspection well have grass too. Hopefully within the next two weeks. In the meantime were going to get raised planters built for the backyard. We've got part of one together we just have to plain more wood to complete it. The yard is finally cleared of all our reclaimed wood except now its filling the garage. It'll hopefully all get used in the building of the planters and then maybe I can actually park in the garage.

Wednesday 15 August 2012

Tote

I saw this tote pattern on Pinterest and thought it would be great for toting all my supplies to costume days. Lots of pockets on the outside for scissors, rulers and other notions. The pattern is free to download which is great. It gives you the dimensions for all the pattern pieces so I made up my own pattern pieces from that. They're all basic rectangles, easy to draw up. The pattern calls for three different fabrics, one of which should be quilted. I only had the one quilted fabric in my stash which I love and I was able to find a couple other fabrics in my stash to match.


First I cut out the main body of the bag out of the quilted fabric. The sewed the two pieces together with the right sides together.


Then I cut out the outer pockets out of a light lilac fabric.


Then the many trim pieces and inner pocket.


I sewed the edging to outer pockets.


I pressed the trim flat and folded it over the back side of the pocket to cover the top of the pocket.


Next I sewed the bottom panel of the bag to the two side pockets.


I then top stitched the outer edges of the pockets to the main body of the bag and the seams to divide the outer pockets into three separate compartments.


At this point I deviated from the pattern instructions for making the pocket as they seemed way more detailed than a pocket needed to be. I used the rectangle from the pattern. 


I sewed the zipper onto the two ends of the pocket.


Once the zipper was on I laid the pocket flat with the zipper about 1 1/2 inches from the top of the pocket and sewed the sides shut.


Next I sewed the pocket to the inside of the bag.


 For the bottom of the bag you fold the bottom up to meet the bottom of the side pockets. You then sew from the top side of the bag down to the bottom sewing the folded in piece flat down together.


For the straps I folded the fabric in half and sewed the right sides of the fabric together. 


I turned it inside out and pressed it and then top stitched along each edge. I then lined them up with the pocket seams on the outside of the bag and sewed them to the top of the bag.


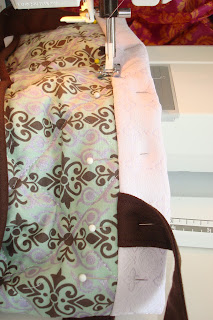
Lastly I pinned the trim for the top edge down. once sewn down I sewed the two ends of the trim together. 

Then i folded it over and pinned it down to the inside of the tote sewing it down to close it up. I tacked the top of the straps down to the top edge of the bag.


Yay its finally done. I've been working on this for about six weeks. Normally it doesn't take me this long to complete a project but I've only been able to snatch a 1/2 an hour here and there to work on it with all the yard and garage work we've been doing lately.