Friday 29 June 2012

Ahi Tuna Salad

This is a favourite dish in our house.


Dressing
2 Tablespoons of Raspberry Vinaigrette
2 Tablespoons of Balsamic Vinegar
2 Tablespoons of Olive Oil
1 Tablespoon of Dijon Mustard
½ - 1 Tablespoon of Brown Sugar

Mix all ingredients together

Salad
1 small package of mixed greens, baby greens (your choice)
1 cup raspberries
1 can of mandarin oranges
Handful of Shaved almonds or walnuts
Handful of dried Cranberries
(2) Sliced Avocados
Feta in Olive oil with green olives, drain the olive oil(can be found at Wal-Mart in the cheese section)
-          Have not tried to use this olive oil in the dressing, might be worth a go.

Combine everything in a large bowl. Drizzle with dressing.

Ahi Tuna
(4) 5 oz pieces of Ahi Tuna

1 teaspoon of salt
1/4 teaspoon of cayenne pepper
 1 table spoon of pepper corns.
2 tablespoon of butter
1 tablespoon of olive oil.

Season tuna with salt and cayenne pepper

In a frying pan over medium high heat combine the butter, olive oil and pepper corns.
Heat until pepper corns are soft and pop.  (approximately 5 minutes)

Once the pan is ready place the seasoned tuna in the pan for:
1 minutes per side (Blue rare)
1.5 minutes per side (medium)
2 minutes per side (well)

Slice the tuna into bit sized pieces and plate with the avocado/salad.
  
The above will serve four people.

Thursday 28 June 2012

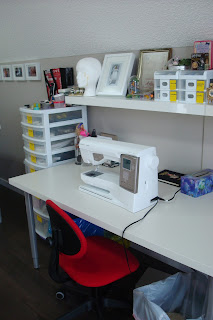
Sewing Room


When we were looking to buy a new home one of my top wants was a sewing room, not just a small second bedroom that could be turned into a sewing room, but a bonus room or a spacious basement area that could be used without sacrificing room for guests or a gym. We lucked out finding a home with a third floor that has a bonus room plus an extra spare bedroom.

My former craft room was a small second bedroom. I never actually crafted in it, it really just held all my supplies which also overflowed into the other spare room. I did most of my work at the dining room table as it had a nice view of the TV for entertainment while working. I was a little worried when construction was under way that maybe the room would be too small but everything fit in nicely.


One of my must haves was a big cutting table. No more laying out fabric across my living and dining room floor. I have two Ikea desk table tops that are 60" by 30" so pushed together they form a nice big square, perfect for laying out fabric that's 60" wide. I got adjustable legs also from Ikea to raise it to the proper height so i'm not hurting my back leaning over it. I have two dressers underneath for storing fabric and costume accesories. Also many totes to store more fabric, hats and wigs.


I have two more table tops and adjustable legs the same as the cutting table but much lower for sewing at. The nice thing with these is when I'm hosting costume day with my friends they can be pulled out and turned around to make a big square or to have as two seperate tables to make more room for everyone to have a space to work.


On the opposite side of the room there's a couch and another smaller work space for my husband or when friends are over sewing.


I keep all my patterns underneath the coffee table, the boxes I store them in fit perfectly.


Wednesday 27 June 2012

Yellow summer dress

When I first got on my dress making kick I really wanted to make an Infinity dress. I'd seen a lot of how to's on Pinterest and thought it looked very easy to do.

I found some beautiful yellow jersey knit, I got 5 meters for $10 total. I followed the directions and quickly came to a snag. The instructions said to cut out the waist of the circle skirt to your exact waist measurement, huge mistake, my jersey had tons of stretch to it and it was way too big, I had to take it in to half my waist measurement to fit properly. My fabric was very see through so I doubled it for the skirt, silly me didn't think to double to straps that wrap around to create the different styles, needless to say that wasn't good. I fixed the dress and made it work but overall I was dissapointed with the outcome. It was a lot of fabric, it didn't pack well for travelling, I couldn't wear it to work because it didn't cover your shoulders and back properly, so I decided to revamp it.

I removed the long straps for wrapping. I used the same top pattern seen here and I thankfully still had enough fabric left over from the first time around to make a new top and double the fabric. I kept the waistband on the skirt from the original dress and just sewed the top to the waistband. I chose not to hem the bottom of the dress as the jersey knit doesn't fray and it gives it a clean look.

Tuesday 26 June 2012

Pink Linen Dress

As I've mentioned before I've been on a dress making kick lately. While searching some fabric to make summer dresses with I came across some vibrant hot pink linen. I got a metre and a half for $5. I pretty much used the exact instructions for the dress pattern, very unusual for me.


The only change I made was to put a facing around the neckline. I find it creates a much cleaner look. I chose not to line the dress as the fabric was thick enough not to be see through.

Monday 25 June 2012

Mostly Homemade Mondays

Check out Mostly homemade mondays at Frugal by Choice for lots of great projects ideas.

Dress for a spring wedding

My friend Tracey got married this spring and had a tea themed wedding. I decided to make my own dress for the occasion. I've been wanting to make a dress from this pattern for a long time.


I contemplated it for my wedding dress but I didn't want to look like I was copying Kate Middleton. So I used this pattern for the top of my dress going with the cap sleeves instead of the long sleeves. I used some lace fabric bought for another project and a satin to line it.

For the skirt I used my trusty circle pattern seen here. I fully lined it so it would hang nicely and have a nice weight. I hemmed it by hand.

For the cummerbund I made it from the shirt lining. I spaced out the pleats, sewed them down on the back so they would hold their shape and pressed it with the iron to give them a crisp edge. I then sewed the shirt to the skirt with the cummerbund attached only in back along the invisible zipper seam.

Friday 22 June 2012

Paperless Paper Towels

I've seen a lot of paperless paper towels online lately and thought I'd try my hand at making my own. I used terry towel for one side and flannelette for the other side. Rather than buying terry towel fabric I bought a package of 25 washcloths at the dollar store for $5. I went with dark coloured washcloths because I thought it would hide stains the best from wiping up messes.


For the flannel I used a combo of new fabric bought for the project and some I had in my stash. I pre-washed my fabric and washcloths before starting my project to prevent any shrinking after the fact. I also trimmed the tags off all the washcloths. The washcloths shrunk a bit which changed how I decided to put them together.

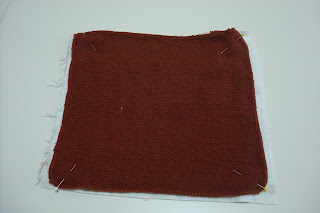
I laid the washcloths out on top of the fabric to cut the fabric to the same size, I did cut the flannelette slightly larger than the washcloths as the washcloths have a tendency to stretch as they run through the serger leaving you with not enough fabric to cover the whole square.


I pinned the two layers, fabric and washcloth, together with good sides facing out. I made sure the side of the washcloths that had a little bit of the tag still showing was facing inwards.


I ran each square through the serger with the washcloth lining up with the inside of the blade so as not to make them any smaller than they were just trimming off the excess fabric around the edges.


I serged all four sides closed shut. I decided not to turn them inside out to hide the serging because it would then make them that much smaller especially as they had already shrunk a bit when I pre-washed them. I sewed and a line from corner to corner to form an X to hold the two layers of fabric together, otherwise they tend to pull apart when wiping up messes.


I chose to just store all my towels in a square basket next to the sink rather than snapping them all together on a paper towel roll.


Wednesday 20 June 2012

Striped Summer Dress

I've been on a dress making kick the last couple of months. Its been my first foray into making "real clothes" that I've had success with. I've tried making a couple coats in the past but haven't been happy with the results. I can recreate a complicated costume with no problem so I figured surely I could make a simple dress and have it come out looking pretty. I was inspired by this dress on craftsy.com. I love the stripe and how it goes from vertical down the front to horizontal down the side.

I bought 2 meters of a striped jersey knit fabric for the dress. I always like to pre-wash my fabric before I start a project. For the skirt I cut out a circle skirt, I have a pattern template made up for 1/4 of a circle that i always use for this purpose. Fold your fabric in half. (The purple fabric is just for demo purposes)


Then in half again so you have four layers of fabric. 


On the corner where the fabric is closed is where you want to cut the hole for your waistband, its always better to cut small try it on then cut larger as needed, if you cut too large a hole you can't go back. If you do happen to cut your hole too large you can always gather slightly before attaching to the top. The size of hole all depends on the amount of stretch in your fabric, some jersey stretches much more than others. Personally I just cut and try it on till I get the fit I want. With a stripe fabric you want to make sure you don't cut the waist hole too tight or it will cause the stripe to stretch out and look unflattering when you put it on.


For the length of the skirt you need to measure from where your bust line will end to where you want your hem to be. My bust line is high on this dress and I prefer my skirts on the longer side so I made my skirt as long as the width of the fabric would allow for.


I'm not a big fan of halter tops so I took a dress I own that I really like the top of and I traced the front and the back of the top onto paper to create a pattern, make sure you add seam allowance onto your pattern so its not too tight once sewn together. You can also use a t-shirt or tank top, whatever you have that you like the fit of.


I serge the sides of the top together then the shoulder seams. I like the serger for stretchy fabrics but you can also use a stretch stitch on your sewing machine. I then pinned the skirt to the bodice, making sure to line up the stripes in the centre of the front and back of the skirt with the centre front and back of the top otherwise you lose the stripe effect your going for. Once you have it all lined up you just sew the two pieces together. To finish it off I hemmed the sleeve holes and back of the neckline with a stretch stitch on my sewing machine. For the style I went with the front of the neckline did not need hemming as it has an excess flap of fabric that tucks into the neckline. I chose not to hem the dress, as its a jersey knit the fabric will not fray so I left it as is to give it a clean edge, just make sure you have a clean line cut around the hem and no jagged scissor edges if you choose to go this route.


Monday 18 June 2012

Napkins

  We recently came back from a cruise and one of the things that really struck me on the boat was the napkins. Every set of cutlery was wrapped in a huge napkin, regardless of whether you were in the main dining room or at one of the many cafeteria style dining venues. It reminded me a lot of my Grandparents home where you always had your own napkin and napkin ring to use when visiting. We have a lot of guests and go through a lot of paper towel and paper napkins, I thought it would be great to start using real napkins again to save all the paper waste. The one thing I loved about the napkins on the cruise was the size, they completely covered your lap with fabric to spare, not a tiny little napkin that you still manage to get food on yourself while using. I made up my own template for the napkins, going with a 22" x 22" square.

  For the fabric I used a nice soft white cotton sheet i picked up at community league fabric sale, someone was selling off their whole fabric stash. I manage to get 11 napkins out of the sheet. I then used the roll hem on my serger to give the edges a nice clean finish I didnt' take any fabric off the edges as i ran it through, i just ran the fabric along the inside of the blade to maintain the size.

  For a finishing touch I used my embroidery machine and embroidered each napkin with our frequent guests initials so each person would have their own to use while visiting.

I used the Cirque Alphabet from Urban Threads for the initials. Now I just need to collect some antique napkin rings to use with them.


Reclaimed wood

We spent most of Sunday afternoon removing all the nails and bazillion staples from our reclaimed wood to get it ready for building with. This is now my new favourite tool, the Mechanical Nail Puller.

A definite must when working with reclaimed wood, it made removing nails a cinch.

Saturday 16 June 2012

Pull Up Bar

My husband and I recently started P90x again. Unfortunately our single pull up bar on the door frame that doesn't have much support just wasn't cutting it.


So my husband built a double one to hang from our basement rafters. We have engineered or I beams in our basement so we needed to add additional support on either side of the beams to bear the weight of the pull up bar.


We used a mix of 2x4s and 2x6s for bracing on either side, scrap we had left over from building our garage. We used 3 2x10s to hang the pull up bar from. One on either end and another in the middle for extra support. We made our 2x10s 28 inches long, that's what worked for our height but we're both on the shorter side,  really you need to make it what size will work for you depending on your height and how high you can reach to get the bar. I can just reach it when I'm on my tiptoes so there's enough clearance my legs aren't hanging on the ground but i also use a chair for assisted pull ups and its just the perfect height for that.
For the bar we used 3/4 inch black pipe, however even though its called 3/4 its 1.05 inches in diameter, confusing yes, it can be found in the plumbing aisle of your local hardware store. We drilled out 1 1/4 inch holes in the 2x10s about 3 inches from the bottom  for the bar to go through. We used (5) 3 inch deck screws to join the bracing boards to each side of  the I beam. Then another 5 screws to join the 2x10 to the bracing.

After all the 2x10s were up we just slid the bar though the holes and covered the bar with bicycle  handle bar tape, available at your local bike parts supplier, we got one pack for $10.


If you are worried about the bar sliding out, just get a couple of hose clamps, also available at your local hardware store in the plumbing isle.

Reclaimed Wood

  We spent the morning collecting wood for a few upcoming projects. My husbands work has a few crates and pallets that they were finished with so we disassembled them with some effort and brought them home.


I've been wanting to put a bunch of raised planters in the yard when we get our deck in and they had one really long crate that was perfect for planters so that saves having to build those. The rest of the wood is going towards a work bench in the garage and a couple decorating projects for the house, can't wait to get started on them. Hooray for free lumber.